Asus Zephyrus M15 (2020) Hackintosh
Posted
Contents
Intro
So you’ve bought yourself an Asus Zephyrus M15 laptop. You’ve just opened your brand new laptop and booted up straight to Windows ready to play some games. For $1500, you get yourself a Six Core 10th generation i7-10750H processor and RTX 2070 graphics. Something seems missing, however.
Despite all the positives of this laptop, if you’re like me and coming from a Macbook Pro, it means you have to give up all of your productivity tools on macOS. You also lose the ability to use XCode for Apple Development. Fear not! Modern Hackintosh solutions allow a user to install macOS on pretty much any hardware.
OpenCore, a modern bootloader, is what handles all of the software injection into macOS. See, our hardware itself does not play nicely with macOS so there are a series of patches, kexts (think drivers on Windows), and other system files that need to be loaded into macOS before booting can occur. OpenCore handles most of the work for us, and is actually really easy to get working.
Things you will need
- A spare USB drive that is at least 8GB
- This is used to contain our OpenCore files as well as the macOS installer
- A separate boot drive to install macOS on to
- I used a 1TB Sabrent Rocket Q M.2 SSD that I installed in the laptop. It can be purchased here
- A USB WIFI Adapter
- This is not necessary as you can use the built in WIFI card. It is just less stable at the time of this writing. More on this in the WIFI section.
- A seperate computer
- You can use the Windows install on this laptop to do the setup.
- If your seperate computer is running Windows and NOT macOS you will need an ethernet connection as the tools on Windows do not fully download the macOS installer.
- A USB Mouse
- This is needed to complete the macOS install and to configure our Trackpad.
Setting Up OpenCore
To begin, I would highly recommend checking out Dortania’s OpenCore Install Guide, which contains a comprehensive guide on how to get OpenCore and macOS running on almost any hardware. I followed this guide when creating my config files, and when deciding what kexts to install. If anything from this guide is confusing to you, please check out Dortania’s guide first as the explanation may be there.
With that out of the way, lets begin with creating our USB.
Gathering The Files
To begin, lets download the OpenCore files from the repository. Download this zip file and unzip it onto your computer.
OpenCore
- OpenCorePkg
- I highly recommend downloading the debug version for better debugging if things go wrong.
ProperTree
Next, we need a plist editor. Most of the work in setting up OpenCore comes with editing our config.plist file. Dortania’s guide and myself recommend ProperTree, as it has basic OpenCore features baked into it. You’re going to get out your terminal of choice for this one.
ProperTree for macOS:
git clone https://github.com/corpnewt/ProperTree
cd ProperTree
chmod +x ProperTree.command
./ProperTree.command
ProperTree for Windows:
git clone https://github.com/corpnewt/ProperTree
cd ProperTree
./ProperTree/ProperTree.bat
If you want to launch ProperTree without using the command line, navigate to the folder that the repository was cloned to and double click the ProperTree.command file (ProperTree.bat on Windows).
GibMacOS
Next we’re going to want GibMacOS. GibMacOS is a tool that can be used to download macOS on non-macOS computers. If you are on macOS you do not need GibMacOS, but it can be helpful if you want a specific version. Open up command line again and get to work.
git clone https://github.com/corpnewt/gibMacOS
cd gibMacOS
./gibMacOS.command
./gibMacOS.bat on Windows computers.
Now that you have all of the required files, lets start making the USB.
MountEFI
This is needed to mount the EFI partition on both the USB drive and the macOS system. This is generally only needed for macOS as gibMacOS will mount EFI on Windows.
git clone https://github.com/corpnewt/MountEFI
cd MountEFI
chmod +x MountEFI.command
You can run MountEFI by either double-clicking on MountEFI.command or by ./MountEFI.command.
Creating the USB Installer
Again, I really recommend using Dortania’s guide for this as it will go into much more detail than I will here. Most of the process that I have outlined here has come from the guide. Alas, if you want a guide specific to this laptop, continue on.
- Plug your blank USB into the computer.
- THIS WILL COMPLETELY WIPE YOUR USB
- Launch gibMacOS.command (.bat on Windows)
- You will be greeted with a screen that looks like this:
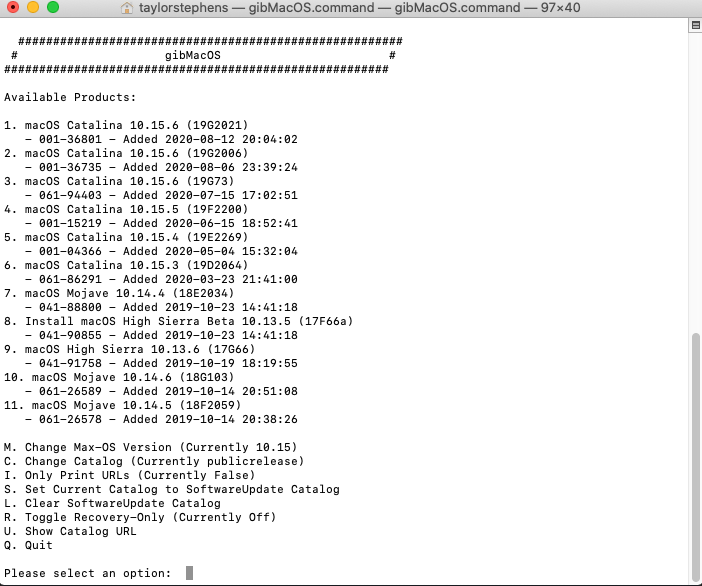
- You can explore the different options to configure the install how you want.
- If you’re on Windows, you must press
Rand enter to toggle RecoveryOnly.
- If you’re on Windows, you must press
- Press the number of the version you are looking for.
- I pressed
1and enter to download the most recent version of Catalina 10.15.6
- I pressed
- When the file is finished downloading, it will be in the
gibMacOS/publicrelease/folder.
Now we’re going to create the macOS installer.
- Double click
BuildmacOSInstallApp.command. - Drag and drop the folder in the publcrelease folder to the command window.
- Press enter to build the macOS install app.
- Drag the app in the gibMacOS folder to your Applications folder (this makes things easier later on).
Now we’re going to format the USB drive. This process is slightly different on macOS and on Windows. For this, I will show the mac version, but you can see how to do it on Windows here. You can skip the rest of the steps in the Creating the USB Installer section if you are on Windows.
- Plug your USB drive into your Mac.
- Launch Disk Utility.
- Press
CMDand2to show all volumes and click on the USB (San Disk Cruizer in my case) NOT the partition. - Click Erase in the top middle.
- Enter the options as shown below:
- The name can be anything, but we will use
USBfor this guide.
- The name can be anything, but we will use
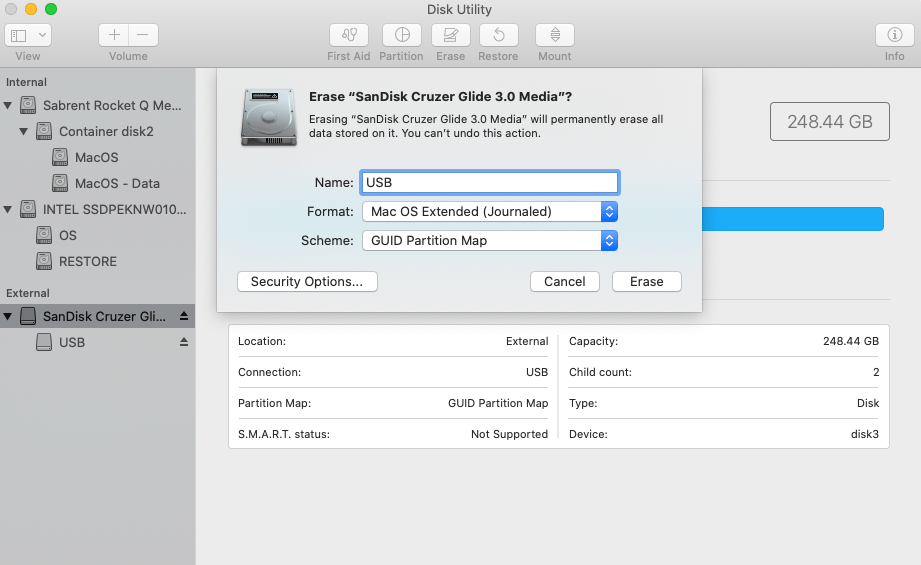 Finally, we are going to put the macOS install app on the USB drive. This is not as simple as dragging and dropping, but thankfully Apple has create a nice tool to do this for us.
- Open up a terminal window and run the following command:
sudo /Applications/Install\ macOS\ Catalina.app/Contents/Resources/createinstallmedia --volume /Volumes/USB
Note, if your macOS install app is not in the Applications folder you will need to modify the path to the Application. Also, if your USB drive is not named USB, you need to change the name in the command.
Finally, we are going to mount the EFI partition to get set up with OpenCore.
- Run MountEFI.command
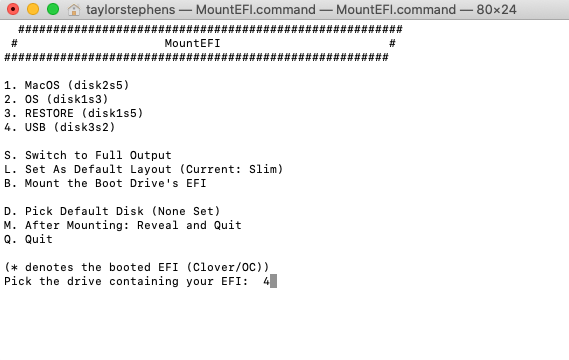
- Enter the number that corresponds with your USB drive and press enter.
This will mount the EFI partition of your USB drive to your computer. Make sure your EFI partition is empty. If it is not empty, you likely mounted the wrong EFI partition.
Adding OpenCore files to your USB
Now that you have the EFI partition mounted, you need to add the OpenCore files to the USB. Note: If you are on Windows and followed Dortania’s guide, you can skip this entirely.
- Unzip the OpenCorePkg file that you downloaded.
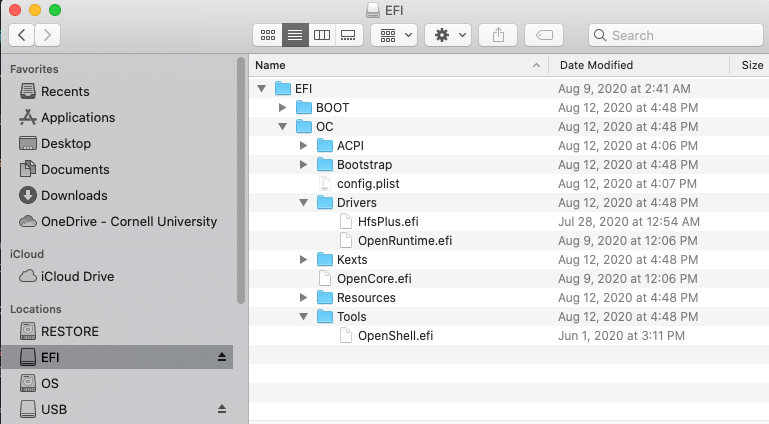
- Move the EFI folder from the OpenCorePkg folder to the root of the EFI partition on your USB.
- Navigate to the
EFI/OC/Driversfolder on your USB EFI partition and delete everything exceptHsfPlus.efiandOpenRuntime.efi. - Delete everything in the
EFI/OC/Toolsfolder exceptOpenShell.efi. - Heres what the EFI should look like when you’re done:
Adding the Proper Kexts
With the OpenCore files properly added to your EFI partition, it is time to grab the kexts (think drivers on Windows) that MacOS needs to function. Add these to the EFI/OC/Kexts/ folder.
- VirtualSMC
- This is required for macOS to boot. It emulates the SMC chip found on real Macs. No Hackintosh will boot without this kext.
- You may notice that there are many other kexts that come with this download. You are also going to want to install
SMCProcessor.kext,SMCBatteryManager.kext, andSMCSuperIO.kext.- These will be used to enable temperature monitoring, fan control and checking, and battery management which is required for getting the trackpad to work.
- Lilu
- This does a lot of patching that is required by other kexts that our Asus laptop requires.
Graphics
- WhateverGreen
- This is needed for patching a lot of things related to graphics. This includes a file named
SSDT-PNLF.dsl. Do not use this file, as we make our own later.
- This is needed for patching a lot of things related to graphics. This includes a file named
Audio
- AppleALC
- This is needed to patch the AppleHDA kext to work with our audio so we can get audio through our system speakers and microphone input. More with this later.
Ethernet
- RealtekRTL8111
- This is needed to get ethernet working on our machine. This is needed if installing using a Windows-created macOS installer.
WIFI
- Do not download a kext for this now, we will manage this later.
Extra
- CpuTscSync
- This is needed for our specific laptop. It makes sure that our TSC can sync. If you don’t know what this means, don’t worry about it just install the kext.
- NVMeFix
- This is needed for macOS to be able to recognize NVMe drives that are not Apple drives. This is needed (at least for me) as I installed an after market NVMe SSD. You will likely need this as well.
- NoTouchID
- This is needed to disable TouchID, as our mac will look like a 2019 Macbook Pro and does not have a TouchID sensor.
- Without this kext, macOS will not function.
Input Kexts
- VoodooPS2
- This is needed to get our keyboard functioning.
- Place VoodooPS2Controller in the
EFI/OC/Kextsfolder.
- VoodooI2C
- This is needed to get our trackpad working.
- Along with
VoodooI2C.kext, addVoodooI2CHID.kextto your kexts folder as well. - This is by FAR the hardest thing to set up with our laptop. For now, just add the kext.
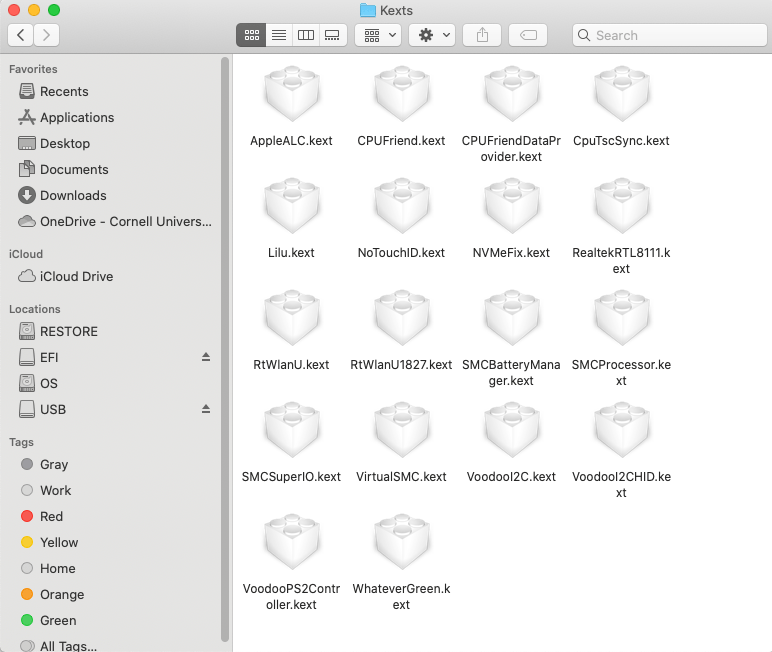 This is what my kexts folder looks like at the VERY end of the guide. For now, you can ignore some of the additional kexts as we will configure those later.
Creating the proper SSDT files
So, you’ve just added all of the kexts to your kexts folder and you think this is pretty easy so far. Now, let me give you some background into what SSDT’s really are. Every computer has a BIOS. The bios communicates a certain file to each operating system called a DSDT file. This allows the operating system to communicate with the actual hardware that our computer has. Unfortunately for us, ASUS makes the DSDT file to work with Windows and NOT macOS. SSDT files are basically patches that allow macOS to communicate with our hardware.
Dortania’s guide goes over in detail how to make SSDT patches for every device. It is honestly pretty easy to follow, but it is too complex for me to go over in this guide. If you would like to make your own SSDT files, I will link you to where you can learn to make them.
This Laptop’s CPU is Comet Lake, so follow the Comet Lake section of the guide.
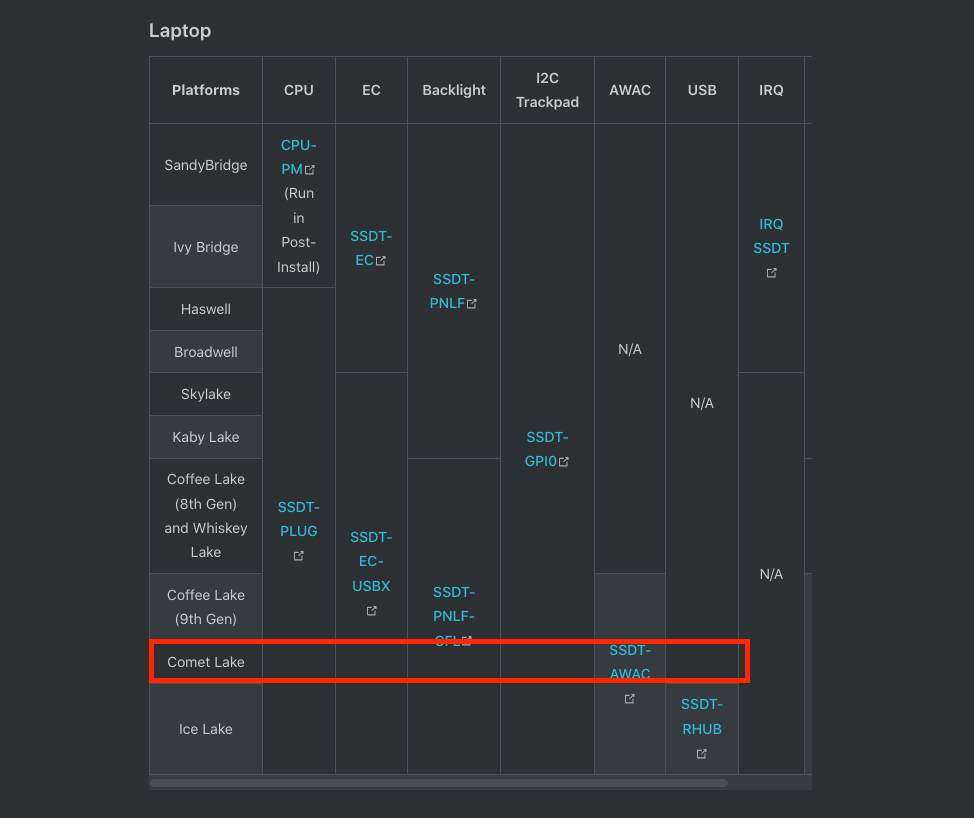
- Make
SSDT-GPI0andSSDT-XOSIunder the SSDT-GPI0 section of the guide. - You also need to make RHUB, even though it does not fit under the Comet Lake section of the guide.
- There is one additional SSDT we need to make to get the trackpad functioning, I will go over that in the Trackpad section of this guide.
If you do not want to make your own SSDT’s I will include my SSDT’s here.
Creating your config.plist file
The config.plist file is what tells OpenCore what to do with our system and what to patch. There is a VERY good explanation available on Dortania’s Guide so I will not be helping you create your config.plist in this guide. Regardless, there are some steps to take to get started with making your config.plist. I will also go over some specific changes from the guide that is needed for this laptop.
- Go into the
OpenCorePkgfolder that you downloaded and copy thesample.plistfile from theDocsfolder intoEFI/OC. - Rename this file to
config.plist. - Open
ProperTree.commandin the ProperTree folder you downloaded. - Press
File > Openand then select your new config.plist. - Press
File > OC Clean Snapshotand select your OC folder on your EFI partition.- This will clean up your config file and include all of the kexts and SSDT files you put in your OC folder.
- Press
File > Saveto save the file.
You’re now ready to follow the Cofee Lake Plus section of the Dortania Guide.
Some notes that are different from the guide
- At the very top of the ACPI section, make sure you follow the SSDT XOSI rename part even though you are using SSDT-GPI0 and SSDT-XOSI.
- Turn off
SetupVirtualMapin theBootersection.- If this is on, your system will not boot.
- Under
DeviceProperties, you need to put the values in the screenshot below for graphics to be working properly: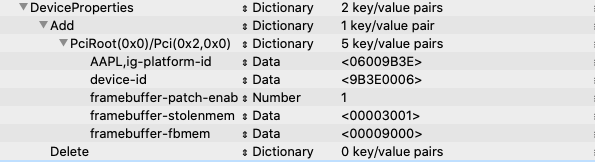
- Under
Kernel > Quirksmake sureAppleCpuPmCfgLock,AppleXcpmCfgLock, andDisableIOMapperare enabled.- This is required as there is no way to change these settings in the BIOS on our computer.
- Under
Misc > SecuritysetAllowNVRAMResetto false.- I have not tried it with this option enabled, but reseting the NVRAM could cause problems on this laptop that may not be able to be reversed.
- Under
NVRAM > Add > 7C436110-AB2A-4BBB-A880-FE41995C9F82 > boot-args, use these boot arguments:-v debug=0x100 keepsyms=1 -wegnoegpu alcid=13- This will enable verbose mode (so you can see the entire process of booting to diagnose errors), enable debug mode, and turn off the NVIDIA GPU in our system.
- This also sets the audio device layout so our speakers can work with macOS.
- When creating your SMBIOS under
PlatformInfo, make sure you selectMacbookPro16,1. It is most compatible with the parts in this laptop.
If things go wrong after following this guide, and your system won’t boot, try looking at the Troubleshooting section of the Dortania Guide. I will NOT post by config.plist as I feel that it is very important for people to try and make their own config.plist to learn more about the system. It is not as hard as you may think at first.
Necessary BIOS Settings
There are some settings in the BIOS that need to be changed to allow our hardware to work with macOS. Some of them were changed in the Kernel section of our config.plist as these options are not available in the bios.
- Completely shut down your Laptop
- Press the power button and immediately hold down the F2 key
- This will bring you into the BIOS
- Press
F7to go to the advanced settings.- Navigate around this menu using the keyboard and arrow keys.
- Go to
Advanced > SATAand change the option fromInteltoACPI.- When you want to boot back into Windows, change this option back to
Intel.
- When you want to boot back into Windows, change this option back to
- Go to
Advanced > DVMT Pre-Allocated Graphicsand change this to64MB. - Go to
Boot > Secure Bootand turn offSecure Boot.- This will affect your ability to boot Windows.
- You cannot boot the default Windows install with this option off. If you want to fix this, you can boot into Windows and turn off Bitlocker.
With these settings changed, you should be ready to go to boot the macOS installer!
Installing macOS
With all of this finished, you’re ready to install macOS.
- Shutdown the Laptop.
- Plug the USB into the laptop.
- Press
F2while booting to enter the BIOS. - Press
F8to open the boot menu. - Select either your USB EFI or
OpenCorefrom the boot menu. - You will likely see these options:
- Windows
- macOS Base System (External) / Install macOS Catalina (External)
- OpenShell.
- Select
Option 2.from the menu that corresponds to the macOS installer.
Navigating the macOS Installer
You need to format your drive in order to install macOS. Your drive needs to be both GUID partition scheme and formatted as APFS in order for macOS to be able to be installed.
Note: You will need a USB mouse for this install and to configure the Trackpad.
- Click
Utilities > Disk Utilityon the top menu bar. - Find your drive that you put in your computer.
- For me, this showed up as Sabrent Rocket Q
- Press
Eraseand format the drive asGUIDandAPFS.- Make sure you do not erase the Windows drive or you won’t be able to use Windows!
- Close Disk Utility and proceed with the installer.
- At this point, you will need to connect your Ethernet cable if you made your installer with Windows.
Note: Your system will reboot a few times. Make sure you get back into the OpenCore menu each time, and select macOS installer the first time and then select whatever you named your disk as the second time.
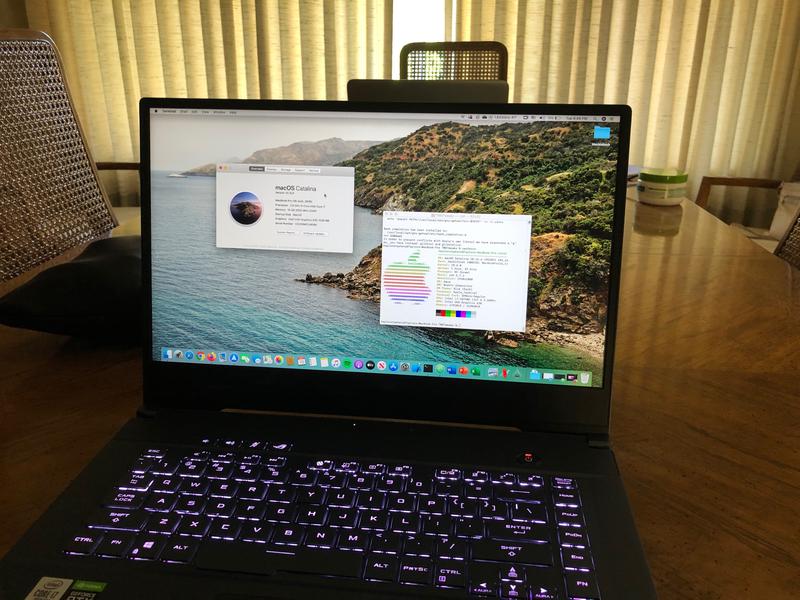
 By now, you should be booted into macOS and going through the initial setup process. Congrats! There are more steps that you need to take to get everything up and running, but for now macOS should work.
Fixing Necessary Things
While macOS is installed and is likely functional, there are some quality of life things we need to take care of in order to get this laptop working to its full capacity.
Things that need to be fixed
- Audio
- CPU Power Management
- Trackpad
- WIFI/Bluetooth
Audio
If you followed this guide to a tee, your audio should already be working as you have set the correct boot-args. In order to get audio working, you need to put alcid=XX in your boot-args where XX is your audio layout ID. For this laptop, I found that 13 is the ID that works the best for this laptop.
- Under
NVRAM > Add > 7C436110-AB2A-4BBB-A880-FE41995C9F82 > boot-argsaddalcid=13.- This should enable audio through the speakers and microphone input for this laptop.
Note: I have not found out how to make the 3.5mm audio jack plug-in to work with this laptop. For now, just the speakers and the microphone work.
CPU Power Management
Because we put SMCProcessor.kext in our Kexts folder, we should have working power management with our system. The problem is that this power management is designed for a Macbook Pro 16” which is NOT what our system is.
In order to tell our system to use a better power management structure, we use CPUFriend.kext and the CPUFiendFiend script to create the power plan.
- The
CPUFriend.kextis meant to enable our power management plan andCPUFriendFriendcreates that plan for us!
Download CPUFriendFriend
git clone https://github.com/corpnewt/CPUFriendFriend.git
cd CPUFriendFriend
chmod +x CPUFriendFriend.command
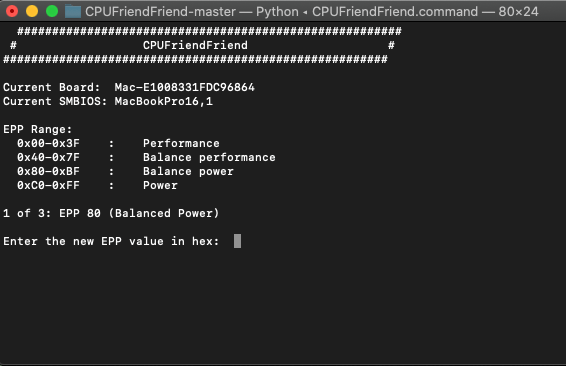
Using CPUFriendFriend
- Run CPUFriendFriend with
./CPUFriendFriend.commandor by double-clicking CPUFriendFriend.command in Finder. - Your screen should look like this:
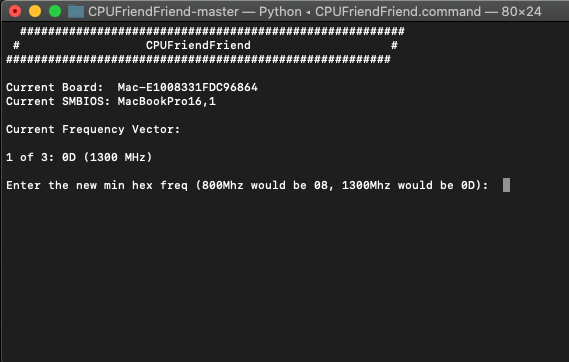 This may look a little confusing at first, but it really is not too complicated. We are going to be using this script to tell the CPU which frequencies it will run at at different stages. I have tried many different configurations for this, but I have found that using 1300Mhz and the most power saving plan works the best at each of the three power stages. The CPU will still increase its frequency beyond this to perform tasks that it needs to. This is just most effective at preserving battery life. Feel free to modify this on your own.
If you want to follow my power plan, follow the steps below. You can create your own if you would like.
- Enter
0Dand press enter.- This will tell CPUFriendFriend to use 1300Mhz for the first stage.
- This will tell CPUFriendFriend to use 1300Mhz for the first stage.
- Enter
C0and press enter.- This will tell CPUFriendFriend that you would like to use the most power saving plan.
- Do this for all three power stages that it tells you to complete.
- Yes it should say 1300Mhz for each power stage.
After doing this, a CPUFriendDataProvider.kext should be in the results folder of CPUFriendFriend.
- Move this kext to your
EFI/OC/Kextsfolder on your USB’s EFI partition.- You may need to mount EFI again with MountEFI.
Finally, you’re going to need to download CPUFriend.kext.
- CPUFriend.kext
- Put this in your
EFI/OC/Kextsfolder on your USB’s EFI partition.
- Put this in your
- Open up ProperTree with
ProperTree.command. - Open your
config.plistfrom your USB’s EFI partition. - Click
File > OC Snapshotfrom the menu bar.- This will add
CPUFriend.kextandCPUFriendDataProvider.kextto yourconfig.plist. - Note: If you do
OC Clean Snapshotit will erase all of your config settings so make sure you doOC Snapshot.
- This will add
- Click
File > Saveto save the file.
With this, your CPU should be managing its power effectively. This will likely improve your thermals and your battery life. If you would like to view your CPU frequencies and thermals, I recommend downloading HWMonitorSMC2.
Trackpad
Oh boy here we go this is the hard one. I spent weeks trying to figure out how to get the trackpad working with this laptop and I have finally got it working. Because I spent so much time myself trying to get this to work, I will burden you with the unnecessary details about why ASUS is terrible at making DSDT files.
VoodooI2C, the kext that is used to make our trackpad work requires SSCN and FMCN values to be sent from out DSDT to our operating system. ASUS, for some stupid ass reason, decided not to include the SSCN values under the I2C controller that the trackpad is attached to. These required values are present elsewhere in the DSDT, however, so it is possible to patch our DSDT to make this work.
Tools
In order to create our own SSDT to patch this, we are going to need MaciASL, a tool for editing and creating ACPI files. If you made your own SSDT files, you likely already have this installed. If not, download it here:
Opening up MaciASL should bring up your system DSDT. You are going to want to find some values from this.
- Press
CRTL/Fand type inSSCN. - Find
Method (SSCN, 0, NotSerialized)underScope (_SB.PCI0.I2C1). It should look like below: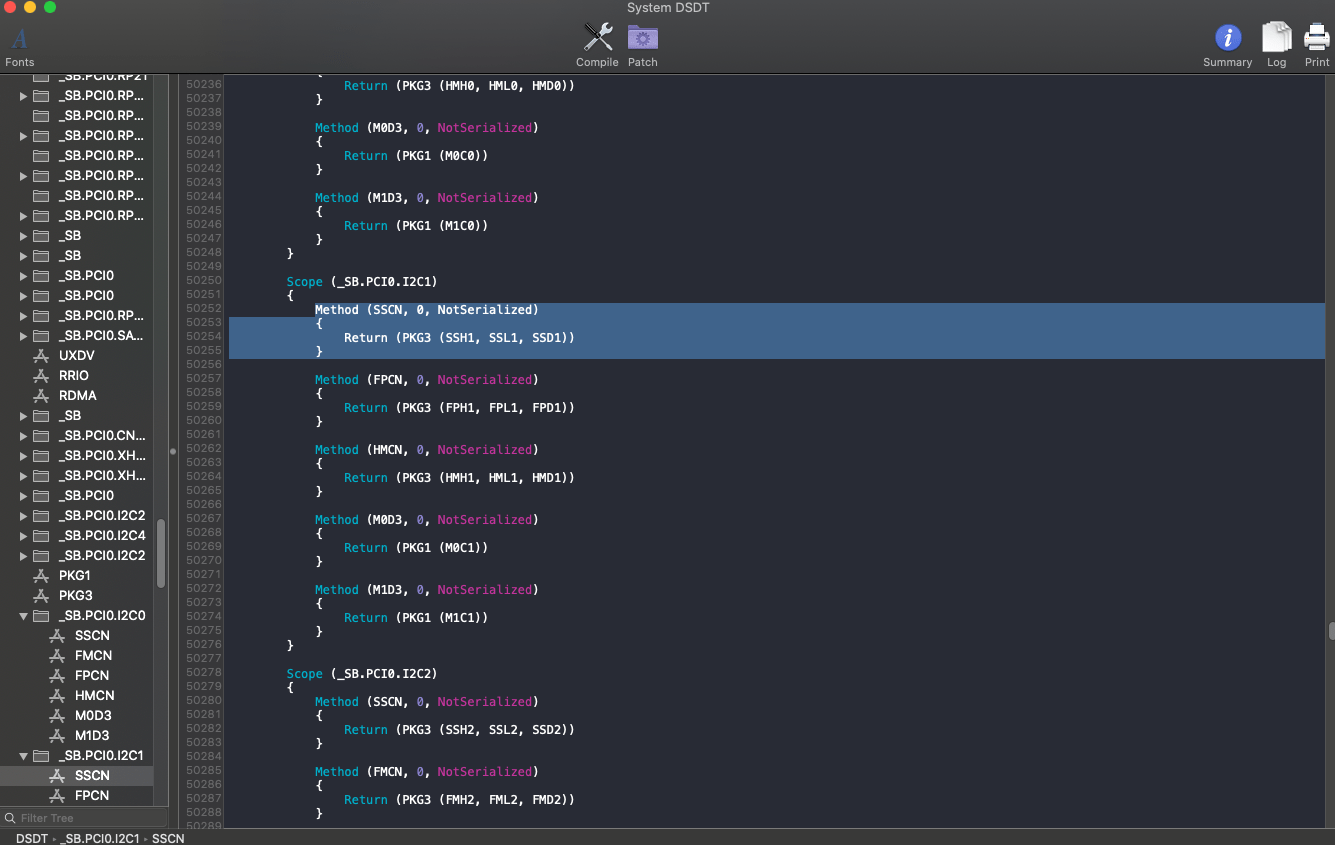
- Screenshot this or keep this handy as you are going to need to do another search.
- Press
CRTL/Fand type inPKG3. You should find this:
- Next, click
File > Newin the menu bar to create a new SSDT. - Next, paste the following:
DefinitionBlock ("", "SSDT", 2, "hack", "I2C", 0x00000000)
{
    External (_SB_.PCI0.I2C1, DeviceObj)
    External (SSD1, IntObj)
    External (SSH1, IntObj)
    External (SSL1, IntObj)

    Scope (_SB.PCI0.I2C1)
    {
        Method (PKG3, 3, Serialized)
        {
            Name (PKG, Package (0x03)
            {
                Zero,
                Zero,
                Zero
            })
            PKG [Zero] = Arg0
            PKG [One] = Arg1
            PKG [0x02] = Arg2
            Return (PKG) /* \_SB_.PCI0.I2C1.PKG3.PKG_ */
        }

        Method (SSCN, 0, NotSerialized)
        {
            Return (PKG3 (SSH1, SSL1, SSD1))
        }
    }
}
As you can see, my SSDT-I2C.dsl file has both the PKG3 method and the SSCN method from my DSDT. This is essentially adding these methods to my I2C controller. The DefinitionBlock is meant to tell OpenCore to load this SSDT file and it defines the changes as unique. The External blocks are meant to define the variables used in the PKG3 and SSCN methods. You may need to modify this based on what you saw in your searches in your DSDT.
- Click
File > Save-Asand save the file asSSDT-I2C.aml. Make sure you change the filetype toACPI Machine Language Binary. - Move this file to your
EFI/OC/ACPIfolder on the EFI partition on your USB. - Run
ProperTree.command, open yourconfig.plist, and doFile > OC Snapshotto add the SSDT to yourconfig.plistfile. - Reboot and hopefully your trackpad should be working.
My SSDT will be available on my Github repo here.
WIFI/Bluetooth
Initially, I purchased a USB wifi adapter to get WIFI working. It worked well, but it was annoying having one USB port always being filled up. Then came OpenIntelWireless.
The creators behind OpenIntelWireless have made kexts that work with the wifi card in this laptop! This means that we no longer need our USB WIFI Adapter. There will be an additional post with instructions for the USB WIFI adapter that I purchased.
Note: Please be aware that at the time of this writing, this kext is extremely buggy and is experimental. The one issue I have had so far is decreased range from my WIFI Card and occasional screen flickering. This is something I can live with, but I know not all users will want this.
To start, download AirportItlwm NOT itlwm. If you are on a different macOS other than Big Sur or Catalina, download itlwm instead.
You are also going to need IntelBluetoothFirmware.
Make sure you are on OpenCore 0.6.1 Release Version for compatibility with this kext.
Now on with the install:
- Move
Airportitlwm.kextandIntelBluetoothFirmware.kextto yourEFI/OC/Kextsfolder.- You can ignore the other kext in the
IntelBluetoothFirmwarefolder as it will not be needed.
- You can ignore the other kext in the
- Run
ProperTree.command, open yourconfig.plist, and doFile > OC Snapshotto add the kexts to yourconfig.plist. - Reboot and get back into macOS with your USB.
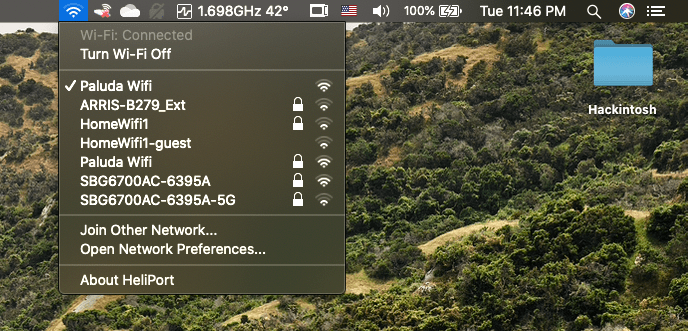
- Connect to your WIFI network in your menu bar.
- If your wifi does not work on the first try, you may need to add the network from system preferences as shown below.

 If your wifi does not work on the first boot, you may need to reboot to get it working.
You should now have working WIFI and bluetooth on your ASUS laptop.
Finalizing Things
By this point, you are almost done! Your Asus Zephyrus M15 should pretty much be fully functional on macOS. It does suck that you have to use the USB every time you want to boot though…
Lets fix that.
Moving EFI to you macOS Disk
- Mount your USB EFI using
MountEFI.command. - Copy your
EFIfolder to your desktop or somewhere safe. - Right click on EFI in finder and click
Eject "EFI".
- Mount the EFI partition of your macOS disk by using
MountEFI.commandand selecting the disk you installed macOS on. - Copy the
EFIfolder that you saved on your desktop or somewhere safe to the EFI partition that you just mounted. - Eject and unplug your USB.
Now, every time you reboot, you don’t need to have your USB drive to boot macOS. Just select OpenCore or your disk in the boot menu in your BIOS.
Final Notes
Here are some notes for using your computer with macOS on it.
- Do NOT boot Windows from the OpenCore menu!
- This will likely break some parts of Windows, as you are injecting your macOS patched
DSDTinto Windows which is not compatible.
- This will likely break some parts of Windows, as you are injecting your macOS patched
- When you want to boot into Windows, you need to go in to BIOS and change the
SATAsetting back toIntelrather thanACPI. You also need to reenableSecure Bootif you haven’t disabled Bitlocker. - If you boot Windows and you get a screen about settings being changed, go to the recovery link that is available on that page and login with your Microsoft account. Type in the recovery key on that website into that blue screen in order to boot your Windows install. I would disable Bitlocker after this.
- The time in your Windows install may be different after just using macOS.
- To fix this, follow this guide and use the section titled:
Make Windows Use UTC Time By Editing the Registry.
- To fix this, follow this guide and use the section titled:
I hope you found this guide useful! This entire process was a huge journey for me and it enhanced my knowledge of Hackintosh and computers in general. I was finally able to make my laptop the ultimate laptop to fit my needs. I could use Windows for games and macOS for all things productivity.
Here is a link to the files in this project on Github.
Disclaimer
I am not responsible for anything that goes wrong with your device as a result of the posts on this site. By trying these methods on your device, you are taking full responsibility for your actions.
View my Github here